Laptop Configuration Used for this demo:


Assign 2 GB ram to NODE1

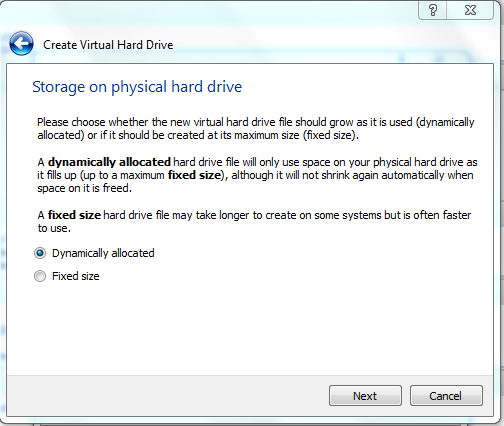
Create a new Virtual machine NODE1 :
Assign 2 GB ram to NODE1
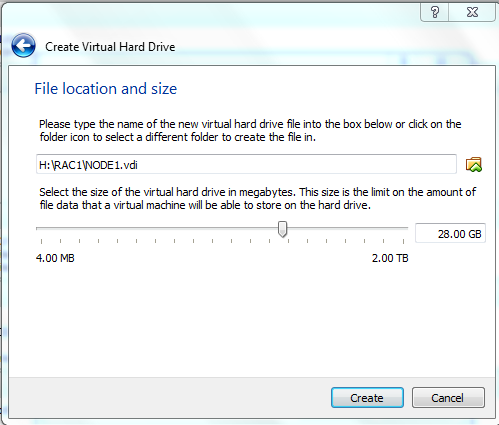
Create the Hard Drive for NODE1: We are going to create a 28GB VDI hard disk.


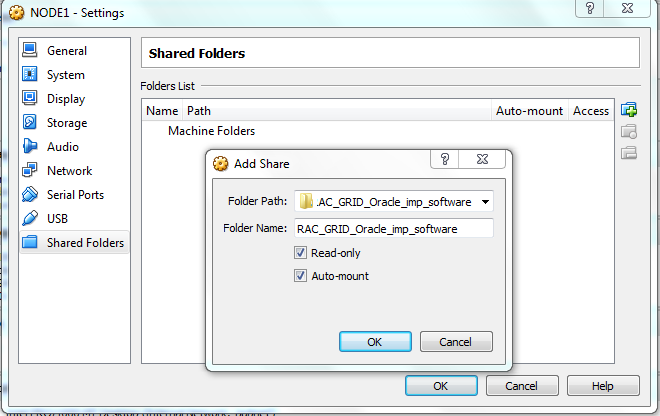
Add shared folders to NODE1 so that softwares can be copied from the laptop to NODE1 VM:
General -> Advanced -> Select the option for Bidirectional Clipboard sharing and Drag n Drop:

Storage -> Controller : IDE -> Browse and select the path of your Oracle_Linux_6.4_64bit.ISO image file:

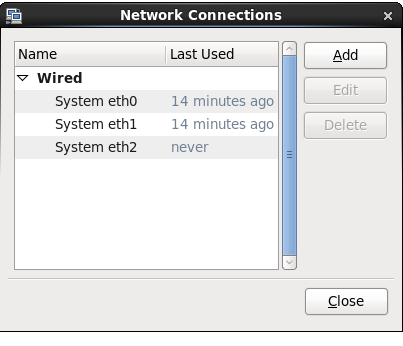
Set up the network . We are setting up network eth0 , eth1 , eth2 as we are going to use this node1 as RAC node .
For single instance setup once eth0 is enough:
Settings -> Network->Adapter 1
Adapter 2
Adapter 3


After all the above settings are complete . Start the NODE1 VM:
Start --> Install or upgrade an existing system and press Enter Key:

click on SKIP :

Click Next

Language Selected as English :

Keyboard type selected as U.S English:

Choose Basic storage type :

click on "Yes discard any data" and next ->

Change the default hostname to NODE1.localdomain and click of configure network .

This window will pop up when you click on "configure Network" :

Select eth0 -> Edit ->check "connected automatically" and go to IPv4 settings:

system eth0 -> edit-> IPv4 settings -> Method -> Manual-> Add -> Address : 192.168.56.71
Netmask: 255.255.255.0
Gateway: 0.0.0.0
check "Connect automatically" and check "Available to all users" and apply the changes.

system eth1 -> edit-> IPv4 settings -> Method -> Manual-> Add -> Address : 192.168.10.1
Netmask: 255.255.255.0
Gateway: 0.0.0.0
check "Connect automatically" and check "Available to all users" and apply the changes.

system eth2 -> edit-> IPv4 settings -> Method -> Automatic ( DHCP)
check "Connect automatically" and check "Available to all users" and apply the changes.

Click Next . It will configure eth0 , eth1 and eth2. ..eth2 can fail you can ignore this error for eth2.

Select time zone:

Specify the password for root user:

select " Use All space" radio box and also check "Review and modify partition layout" checkbox below.


Select lv_swap and click EDIT to open the below window and edit the swap size to 1800


Click on format ->

Write changes to disk ->

Next ->

Select "Database Server" and customize now:

Select the rpms as shown below:


Rpm installation started ->

Rpm installation completed:

Congratulations , your oracle linux server installation is complete. Now click on reboot.

Welcome Screen:


No thanks i will connect later:

Skip this step :


Done now start the VM and Linux installation is complete on NODE1:


Add Groups and create Grid and Oracle user:
=================================
[root@node1 ~]# groupadd -g 200 oinstall
[root@node1 ~]# groupadd -g 201 dba
[root@node1 ~]# groupadd -g 202 oper
[root@node1 ~]# groupadd -g 203 asmdba
[root@node1 ~]# groupadd -g 204 asmoper
[root@node1 ~]# groupadd -g 205 asmadmin
[root@node1 ~]#
[root@node1 ~]# useradd -u 200 -g oinstall -G dba,asmdba,oper oracle
[root@node1 ~]# useradd -u 201 -g oinstall -G dba,asmdba,oper grid
[root@node1 ~]#
[root@node1 ~]# passwd oracle
Changing password for user oracle.
New password:
BAD PASSWORD: it is based on a dictionary word
BAD PASSWORD: is too simple
Retype new password:
passwd: all authentication tokens updated successfully.
[root@node1 ~]#
[root@node1 ~]# passwd grid
Changing password for user grid.
New password:
BAD PASSWORD: it is too short
BAD PASSWORD: is too simple
Retype new password:
passwd: all authentication tokens updated successfully.
Add vboxsf group for vm :
[root@node1 ~]# usermod -G dba,asmdba,oper,vboxsf oracle
[root@node1 ~]# usermod -G dba,asmdba,oper,vboxsf grid
[root@node1 ~]#
[oracle@node1 ~]$ id oracle
uid=200(oracle) gid=200(oinstall)groups=200(oinstall),491(vboxsf),201(dba),202(oper),203 (asmdba)
[oracle@node1 ~]$ id grid
uid=201(grid) gid=200(oinstall) groups=200(oinstall),491(vboxsf),201(dba),202(oper),203(asmdba)
Either configure NTP, or make sure it is not configured so the Oracle Cluster Time Synchronization Service (ctssd) can synchronize the times of the RAC nodes. In this case we will deconfigure NTP.
[root@node1 ~]# service ntpd stop
Shutting down ntpd: [ OK ]
[root@node1 ~]# mv /etc/ntp.conf /etc/ntp.conf.orig
[root@node1 ~]# rm /var/run/ntpd.pid
rm: cannot remove `/var/run/ntpd.pid': No such file or directory
[root@node1 ~]#
Edit the /etc/sysctl.conf to include the below parameters:
========================================
kernel.shmmax = 4294967295
kernel.shmall = 2097152
kernel.shmmni = 4096
kernel.sem = 250 32000 100 128
net.ipv4.ip_local_port_range = 9000 65500
net.core.rmem_default = 262144
net.core.rmem_max = 4194304
net.core.wmem_default = 262144
net.core.wmem_max = 1048576
fs.file-max = 6815744
fs.aio-max-nr = 1048576
root@node1 11.2.0.3]# /sbin/sysctl -p
net.ipv4.ip_forward = 0
net.ipv4.conf.default.rp_filter = 1
net.ipv4.conf.default.accept_source_route = 0
kernel.sysrq = 0
kernel.core_uses_pid = 1
net.ipv4.tcp_syncookies = 1
error: "net.bridge.bridge-nf-call-ip6tables" is an unknown key
error: "net.bridge.bridge-nf-call-iptables" is an unknown key
error: "net.bridge.bridge-nf-call-arptables" is an unknown key
kernel.msgmnb = 65536
kernel.msgmax = 65536
kernel.shmmax = 4294967295
kernel.shmall = 2097152
kernel.shmmni = 4096
kernel.sem = 250 32000 100 128
net.ipv4.ip_local_port_range = 9000 65500
net.core.rmem_default = 262144
net.core.rmem_max = 4194304
net.core.wmem_default = 262144
net.core.wmem_max = 1048576
fs.file-max = 6815744
fs.aio-max-nr = 1048576
[root@node1 11.2.0.3]#
Edit "/etc/security/limits.conf" to include below parameters:
============================================
oracle soft nofile 65536
oracle hard nofile 65536
oracle soft nproc 16384
oracle hard nproc 16384
grid soft nofile 65536
grid hard nofile 65536
grid soft nproc 16384
grid hard nproc 16384
Edit bash_profile for oracle user as below:
===============================
[oracle@node1 ~]$ cat /home/oracle/.bash_profile
# .bash_profile
# Get the aliases and functions
if [ -f ~/.bashrc ]; then
. ~/.bashrc
fi
# User specific environment and startup programs
PATH=$PATH:$HOME/bin
export PATH
umask 022
export ORACLE_BASE=/data01/app/oracle
export ORACLE_HOME=/data01/app/oracle/product/11.2.0.3/db_1
export PATH=$ORACLE_HOME/bin:$ORACLE_HOME/OPatch:/usr/bin:/usr/ccs/bin:/usr/local/bin:$PATH
export LD_LIBRARY_PATH=$ORACLE_HOME/lib:$LD_LIBRARY_PATH
export ORACLE_SID=racdb1
[oracle@node1 ~]$

Edit bash_profile for grid user as below:
===============================
[grid@node1 ~]$ cat /home/grid/.bash_profile
# .bash_profile
# Get the aliases and functions
if [ -f ~/.bashrc ]; then
. ~/.bashrc
fi
# User specific environment and startup programs
PATH=$PATH:$HOME/bin
export PATH
export ORACLE_BASE=/data01/app/grid
export ORACLE_HOME=/data01/app/11.2.0/grid_11203
export PATH=$ORACLE_HOME/bin:$ORACLE_HOME/OPatch:/usr/bin:/usr/ccs/bin:/usr/local/bin:${PATH}
export ORACLE_SID=+ASM1
export LD_LIBRARY_PATH=${ORACLE_HOME}/lib:${LD_LIBRARY_PATH}
[grid@node1 ~]$

Create directory structure for installation of oracle:
====================================
root@node1 ~]# mkdir -p /data01/app/oracle/
[root@node1 ~]# mkdir -p /data01/app/grid/
[root@node1 ~]# mkdir -p /var/opt/oracle/
[root@node1 ~]# mkdir -p /data01/app/11.2.0/grid_11203
[root@node1 ~]# mkdir -p /data01/app/oracle/product/11.2.0.3/db_1
[root@node1 ~]# mkdir -p /data01/app/oraInventory
[root@node1 app]# chown -R oracle:oinstall /data01/
[root@node1 app]# chown -R grid:oinstall /data01/app/grid/
[root@node1 app]# chown -R grid:oinstall /data01/app/oraInventory/
[root@node1 app]# chown -R grid:oinstall /data01/app/11.2.0/
[root@node1 app]# chmod -R 775 /data01/
Configure Oracleasm:
=================
[root@node1 rpmrac]# rpm -ivh oracleasmlib-2.0.4-1.el6.x86_64.rpm
warning: oracleasmlib-2.0.4-1.el6.x86_64.rpm: Header V3 RSA/SHA256 Signature, key ID ec551f03: NOKEY
Preparing... ########################################### [100%]
1:oracleasmlib ########################################### [100%]
[root@node1 rpmrac]# rpm -ivh oracleasm-support-2.1.8-1.el6.x86_64.rpm
warning: oracleasm-support-2.1.8-1.el6.x86_64.rpm: Header V3 RSA/SHA256 Signature, key ID ec551f03: NOKEY
Preparing... ########################################### [100%]
1:oracleasm-support ########################################### [100%]
[root@node1 rpmrac]#
[root@node1 rpmrac]# which oracleasm
/usr/sbin/oracleasm
[root@node1 rpmrac]#
[root@node1 rpmrac]# oracleasm configure -i
Configuring the Oracle ASM library driver.
This will configure the on-boot properties of the Oracle ASM library
driver. The following questions will determine whether the driver is
loaded on boot and what permissions it will have. The current values
will be shown in brackets ('[]'). Hitting <ENTER> without typing an
answer will keep that current value. Ctrl-C will abort.
Default user to own the driver interface []: grid
Default group to own the driver interface []: oinstall
Start Oracle ASM library driver on boot (y/n) [n]: y
Scan for Oracle ASM disks on boot (y/n) [y]: y
Writing Oracle ASM library driver configuration: done

Install Cvuqdisk:
============
You can get this s/w from grid binary of oracle after u unzip p10404530_112030_Linux-x86-64_3of7.zip under /base_folder_where_u_unzipped/grid/rpm/
[root@node1 rpm]# rpm -ivh cvuqdisk-1.0.9-1.rpm
Preparing... ########################################### [100%]
Using default group oinstall to install package
1:cvuqdisk ########################################### [100%]
Check for rpms and install the missing rpms:
=-==============================
[root@node2 ~]# rpm -q --qf '%{NAME}-%{VERSION}-%{RELEASE}(%{ARCH})\n' binutils compat-libcap1 compat-libstdc++-33 gcc gcc-c++ glibc glibc-devel ksh libaio libaio-devel libgcc libstdc++ libstdc++-devel make sysstat | grep "not installed"
package compat-libcap1 is not installed
package compat-libstdc++-33 is not installed
package ksh is not installed
package libaio-devel is not installed
root@node2 rpmrac]# rpm -ivh libaio-devel-0.3.107-10.el6.x86_64.rpm
warning: libaio-devel-0.3.107-10.el6.x86_64.rpm: Header V3 RSA/SHA256 Signature, key ID ec551f03: NOKEY
Preparing... ########################################### [100%]
1:libaio-devel ########################################### [100%]
root@node2 Packages]# rpm -ivh compat-libcap1-1.10-1.x86_64.rpm
warning: compat-libcap1-1.10-1.x86_64.rpm: Header V3 RSA/SHA256 Signature, key ID ec551f03: NOKEY
Preparing... ########################################### [100%]
1:compat-libcap1 ########################################### [100%]
[root@node2 Packages]# rpm -ivh compat-libstdc++-33-3.2.3-69.el6.x86_64.rpm
warning: compat-libstdc++-33-3.2.3-69.el6.x86_64.rpm: Header V3 RSA/SHA256 Signature, key ID ec551f03: NOKEY
Preparing... ########################################### [100%]
1:compat-libstdc++-33 ########################################### [100%]
[root@node2 Packages]# rpm -ivh ksh-20100621-19.el6.x86_64.rpm
warning: ksh-20100621-19.el6.x86_64.rpm: Header V3 RSA/SHA256 Signature, key ID ec551f03: NOKEY
Preparing... ########################################### [100%]
1:ksh ########################################### [100%]
[root@node2 Packages]# rpm -q --qf '%{NAME}-%{VERSION}-%{RELEASE}(%{ARCH})\n' binutils compat-libcap1 compat-libstdc++-33 gcc gcc-c++ glibc glibc-devel ksh libaio libaio-devel libgcc libstdc++ libstdc++-devel make sysstat
binutils-2.20.51.0.2-5.36.el6(x86_64)
compat-libcap1-1.10-1(x86_64)
compat-libstdc++-33-3.2.3-69.el6(x86_64)
gcc-4.4.7-3.el6(x86_64)
gcc-c++-4.4.7-3.el6(x86_64)
glibc-2.12-1.107.el6(x86_64)
glibc-devel-2.12-1.107.el6(x86_64)
ksh-20100621-19.el6(x86_64)
libaio-0.3.107-10.el6(x86_64)
libaio-devel-0.3.107-10.el6(x86_64)
libgcc-4.4.7-3.el6(x86_64)
libstdc++-4.4.7-3.el6(x86_64)
libstdc++-devel-4.4.7-3.el6(x86_64)
make-3.81-20.el6(x86_64)
sysstat-9.0.4-20.el6(x86_64)
[root@node2 Packages]#
Include the entry in /etc/hosts
======================
127.0.0.1 localhost localhost.localdomain localhost4 localhost4.localdomain4
::1 localhost localhost.localdomain localhost6 localhost6.localdomain6
192.168.10.1 node1-priv.localdomain.com node1-priv
192.168.10.2 node2-priv.localdomain.com node2-priv
192.168.56.71 node1.localdomain node1
192.168.56.72 node2.localdomain node2
192.168.56.81 node1-vip.localdomain node1-vip
192.168.56.82 node2-vip.localdomain node2-vip
192.168.56.91 node-scan.localdomain node-scan
192.168.56.92 node-scan.localdomain node-scan
192.168.56.93 node-scan.localdomain node-scan

===================

Check ping node1 and node-priv :

Power off the node1 . In the VirtualBox Manager window start clone wizard: Main menu | Machine | Clone. Type "node2" for the name of new machine. Make sure that "Reinitialize the MAC address of all network cards" is not checked. Then press "Next":


both of them at the same time because MAC address must be unique. No changes will be made to node1, we will pick up three new unused addresses and set them for eth0, eth1, and
eth2 in node2. The easiest way to do that is to change just last character of the address. We are going to change last character to 'D'.
Main menu | settings | Network


Delete the Auto eth3 , Auto eth4, auto eth5 and edit the System eht* with the changed Mac Address
and IP-Address as below:


Change IP address of eth1 to 192.168.10.2 and apply:

Now Edit the Mac address for Sytem eth2 : ( "D" last character as done below)

HOSTNAME=node2.localdomain
Reboot the node2.
[root@node2 Desktop]# cat /etc/hosts
127.0.0.1 localhost localhost.localdomain localhost4 localhost4.localdomain4
::1 localhost localhost.localdomain localhost6 localhost6.localdomain6
192.168.10.1 node1-PRIV.localdomain node1-PRIV
192.168.10.2 node2-PRIV.localdomain node2-PRIV
192.168.56.71 node1.localdomain node1
192.168.56.72 node2.localdomain node2
192.168.56.81 node1-VIP.localdomain node1-VIP
192.168.56.82 node2-VIP.localdomain node2-VIP
192.168.56.91 NODE-SCAN.localdomain NODE-SCAN
192.168.56.92 NODE-SCAN.localdomain NODE-SCAN
192.168.56.93 NODE-SCAN.localdomain NODE-SCAN
Now test that you are able to ping node1 from node2 and vice versa:
[root@node2 Desktop]# ping node2
PING node2.localdomain (192.168.56.72) 56(84) bytes of data.
64 bytes from node2.localdomain (192.168.56.72): icmp_seq=1 ttl=64 time=0.028 ms
64 bytes from node2.localdomain (192.168.56.72): icmp_seq=2 ttl=64 time=0.029 ms
64 bytes from node2.localdomain (192.168.56.72): icmp_seq=3 ttl=64 time=0.035 ms
^C
--- node2.localdomain ping statistics ---
3 packets transmitted, 3 received, 0% packet loss, time 2796ms
rtt min/avg/max/mdev = 0.028/0.030/0.035/0.007 ms
[root@node2 Desktop]# ping node2-priv
PING node2-PRIV.localdomain (192.168.10.2) 56(84) bytes of data.
64 bytes from node2-PRIV.localdomain (192.168.10.2): icmp_seq=1 ttl=64 time=0.029 ms
64 bytes from node2-PRIV.localdomain (192.168.10.2): icmp_seq=2 ttl=64 time=0.036 ms
64 bytes from node2-PRIV.localdomain (192.168.10.2): icmp_seq=3 ttl=64 time=0.032 ms
64 bytes from node2-PRIV.localdomain (192.168.10.2): icmp_seq=4 ttl=64 time=0.032 ms
^C
--- node2-PRIV.localdomain ping statistics ---
4 packets transmitted, 4 received, 0% packet loss, time 3684ms
rtt min/avg/max/mdev = 0.029/0.032/0.036/0.004 ms
[root@node2 Desktop]# ping node1
PING node1.localdomain (192.168.56.71) 56(84) bytes of data.
64 bytes from node1.localdomain (192.168.56.71): icmp_seq=1 ttl=64 time=0.096 ms
64 bytes from node1.localdomain (192.168.56.71): icmp_seq=2 ttl=64 time=0.328 ms
64 bytes from node1.localdomain (192.168.56.71): icmp_seq=3 ttl=64 time=0.377 ms
64 bytes from node1.localdomain (192.168.56.71): icmp_seq=4 ttl=64 time=0.237 ms
^C
--- node1.localdomain ping statistics ---
4 packets transmitted, 4 received, 0% packet loss, time 3065ms
rtt min/avg/max/mdev = 0.096/0.259/0.377/0.108 ms
[root@node2 Desktop]# ping node1-priv
PING node1-PRIV.localdomain (192.168.10.1) 56(84) bytes of data.
64 bytes from node1-PRIV.localdomain (192.168.10.1): icmp_seq=1 ttl=64 time=0.351 ms
64 bytes from node1-PRIV.localdomain (192.168.10.1): icmp_seq=2 ttl=64 time=0.277 ms
64 bytes from node1-PRIV.localdomain (192.168.10.1): icmp_seq=3 ttl=64 time=0.442 ms
^C
--- node1-PRIV.localdomain ping statistics ---
3 packets transmitted, 3 received, 0% packet loss, time 2022ms
rtt min/avg/max/mdev = 0.277/0.356/0.442/0.070 ms
[root@node2 Desktop]#
Checking Server Hardware and Memory Configuration
# grep MemTotal /proc/meminfo
At least 4 GB of RAM for Oracle Grid Infrastructure for a Cluster installations,including installations where you plan to install Oracle RAC.
To determine the size of the configured swap space, enter the following command:
# grep SwapTotal /proc/meminfo
Swap size depend on RAM:
If RAM is Between 4 GB and 16 GB -----> Swap should be Equal to RAM
If RAM is More than 16 GB --------> Swap size should be 16 GB
To determine the amount of space available in the /tmp directory, enter the following command:
# df -h /tmp
Minimum requirement: 1 GB of space in the /tmp directory
To determine the amount of free RAM and disk swap space on the system, enter the following command:
# free
To determine if the system architecture can run the software, enter the following command:
# uname -m
Verify that the processor architecture matches the Oracle software release to install.
For example, you should see the following for a x86-64 bit system:
x86_64
Verify that shared memory (/dev/shm) is mounted properly with sufficient size using the following command:
df -h /dev/shm
If you intend to install Oracle Databases or Oracle RAC databases on the cluster, be aware that the size of the shared memory mount area (/dev/shm) on each server must be greater than the system global area (SGA) and the program global area (PGA) of the databases on the servers. Review expected SGA and PGA sizes with database administrators to ensure that you do not have to increase /dev/shm after databases are installed on the cluster.
To increase /dev/shm edit /etc/fstab like below ( size=size in gb)
tmpfs /dev/shm tmpfs defaults,size=3g 0 0
mount -o remount tmpfs
Prediksi Jadwal Sabung Ayam SV388 25 Februari 2019 - Senin, 25 Februari 2019 – Pada Hari Tersebut Akan Di Laksanakan Berbagai Pertandingan Sabung Ayam Secara Live di Arena Sabung Ayam Thailand.
ReplyDeleteJudi Sabung Ayam – Jika ingin mendaftar Games Permainan Sabung Ayam Khusus SV388. Cara untuk deposit atau withdraw, Anda bisa langsung kunjungi website kami atau langsung hubungi Customer Service kami melalui Livechat yang tersedia di website ini untuk melakukan semua Jenis transaksi Yang Ada.
Untuk Info Lebih Lanjut Bisa Hub kami Di :
wechat : bolavita
line : cs_bolavita
whatsapp : +628122222995
BBM: BOLAVITA
Jadwal Pertandingan Ayam SV388 7 Maret 2019 - Minggu, Ujung Pandang 10 Maret 2019 – Pada Hari Tersebut Akan Di Laksanakan Berbagai Pertandingan Sabung Ayam Secara Live di Arena Sabung Ayam Thailand.
ReplyDeleteSitus Judi Sabung Ayam Online SV388 Merupakan Situs Judi Asal Thailand Yang Sangat Terkenal Dengan Permainan Sabung Ayam Yang Fair dan Menghibur Para Penonton Judi Sabung Ayam.
Untuk Info Lebih Lanjut Bisa Hub kami Di :
wechat : bolavita
line : cs_bolavita
whatsapp : +628122222995
BBM: BOLAVITA